Sunday, 31 May 2015

Frozen Fever, DIY skirt & Barbie dress:)

         Hello all!:) Can I just say how much I enjoy Pinterest?! Lots of inspiration and diy projects. My most recent make has been this flat-front elastic waist skirt from Jaime @ Scattered Thoughts of a Crafty Mom:) I won't go into depth, as her tutorial is fantastic! Very easy. I spent extra time finishing the seams and making it look not too "homemade" it was made as a gift for a friends daughter. She was having a "Frozen" theme Birthday party so I thought this combination would be fitting!:)


       The front skirt piece is gathered to fit the front waistband. Jaime used a corduroy for the main skirt piece of her tutorial. Since I used a cotton, I interlined the front waistband with another piece of cotton cut on the lengthwise grain. Not sure if it was necessary but thought it would be a good idea to give it a bit more stability. The "Frozen" cotton is from Fabricville:) It was on sale too, yay!


        The back waistband has elastic that forms gathers in the back. For the contrasting bottom band, I used a wine coloured "bottom-weight" fabric which was also on sale! I thought the colour coordinated perfectly, and it was good quality fabric. One of the sales associates was very helpful, she suggested that particular colour and the ric-rac trim. Fabricville is definitely my favourite store!:)


       This skirt was such an easy project and I think it looks rather good if I do say so myself!:) It was nice & low stress!  I'll keep this project in mind for future skirts for my nieces. They love frilly, girly things!;)

With some of the leftover scraps I made a matching dress for Barbie! I thought it would be a cute addition to the gift.


     I used the basic bodice pattern from janelwashere.com with a gathered rectangle of fabric (about 12" wide and 6" long). I added a bottom band to her skirt as well. Velcro is used for the back closure.


      I'm sure enjoying sewing for Barbie these days. Stay tuned for more;)


Well, here's the skirt once more. I seem to always be making things last minute, especially around Christmastime! This skirt however, was made over two weeks in advance! Wow, that never happens!

Happy sewing all!:)

Thursday, 7 May 2015

Barbie love:)


        Ah Barbie! One of my fondest childhood memories is with my cousin Alicia, as we used to say, "playing Barbies" . She had a lot of cool Barbie stuff, like Coke bottles (my favourite!) and shoes, accessories etc. So much fun! One of my nieces is into Barbies right now, so I thought it would be fun to sew a few dresses for her. I found some simple & free patterns on janelwashere.com.


      Here is a link to the bodice pattern. Also available is the halter dress pattern. I cut a rectangle of fabric about 12" wide by 6"long and gathered it to fit the the bodice (gather 12" to fit bodice).

I couldn't help but reminisce while making these! I even bought a thrifted Barbie (blonde) to help with the fitting!:) Poor Barbie had a chunk of hair cut off. That also brought back memories of when I cut a piece of gum out of my hair!:) Seems like a lot of kids cut their own hair at some point!

P.S, hot melted margarine (or butter) will take gum out of hair easily!

The brunette Barbie I gave to my niece:)


The floral print I used for my "mermaid" dress:)

I would totally wear dresses like these if they were me-sized!:)

I especially like the peacock print dress!:)

Not the neatest back, but its functional!:)

       All the dresses close with velcro. Don't make the mistake of using sticky-back velcro! Even if it says "sew-in/adhesive velcro", don't try sewing with it! I did and it does not work:( I bought some non-adhesive velcro and that worked great. I later found a tip though, that soaking sticky back velcro in rubbing alcohol for 20 minutes helps to remove the adhesive. I haven't tried it, but I'm going to before buying more velcro.


     Thanks for reading! And thanks Janel, for generously providing the free patterns! I'm sure I'll be using these again in the future:)

Friday, 1 May 2015

First Swimsuit! McCalls 6759:D

Jesus said, "Therefore whoever confesses Me before men, him I will confess before My Father who is in heaven. But whoever denies Me before men, him I will also deny before My Father who is in heaven."

"He who loves father or mother more than Me is not worthy of Me. And he who loves son or daughter more than Me is not worthy of Me. And he who does not take up his cross and follow after Me is not worthy of Me. He who finds his life will lose it, and he who loses his life for My sake will find it."

Matthew 10:32-33 & 37-39

"And blessed is he who is not offended because of Me."

Matthew 11:6


     My first swimsuit!!! Only took me since last summer to finish it! Well, not that I was working on it these past several months (I'm slow, but not that slow!;).  I put it aside last August, simply because it was just too busy with family vacations and such (the *and such* being taking care of Isaac, sewing with a baby is challenging!). Since then, Isaac has come a long way. He's much better sleeping at night and napping during the afternoon. He's also getting better at entertaining himself, so yay, I can sew a bit more:)


        I purchased this tropical print swimsuit fabric at Fabricville last summer. It wasn't at my usual location though. I really wish I had bought more at the time, because I haven't seen it anywhere else since, and I would love to make something else with it. *Sigh*
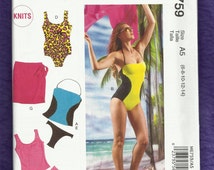


McCalls 6759


I've always wanted to make myself a swimsuit, and McCalls 6759 looked like a good basic pattern to use! I made view D, which is a simple one-piece.

Love the bright colours!:D


   I deviated a bit in the instructions. I added foam cups to the bra section with the help of my Singer Sewing Library book on sewing activewear & swimwear. I also have the Kwik Sew book on sewing swimwear and activewear, but I prefer the Singer books, as they have a lot of photos showing the construction process.


Seriously! These books are awesome!! 


  Instead of following the pattern instructions to attach the elastic, I did my own thing (zigzagged the elastic on and turned the elastic under and topstitched with a double needle).

 It's definitely worth it to do a bit of research on how to sew swimwear before tackling a pattern.


*Note* I did originally add a full lining but made a rookie mistake and didn't ensure the suit was long enough and used a lining fabric that didn't have any lengthwise stretch! I could barely get it on! I decided to cut out the lining (except for the bust and crotch area), so now it fits comfortably! I also sewed the side seams with an overlock stitch instead of a double-stitched seam as the pattern recommends.

I appreciate the full coverage!:)


My little munchkin is also ready with me to hit the beach (or pool)!


Not bad for 11 1/2 months post-partum!;)


Happy sewing all!:)