Monday, 10 April 2017

Camo Tank Dress & School Jacket Downsize (In-Progress)!

Jesus Predicts His Death a Third Time

"Now Jesus was going up to Jerusalem. On the way, he took the Twelve aside and said to them,
  “We are going up to Jerusalem, and the Son of Man will be delivered over to the chief priests and the teachers of the law. They will condemn him to death  and will hand him over to the Gentiles to be mocked and flogged and crucified. On the third day he will be raised to life!”

Matthew 20:17-19


 Happy Monday everybody!:) Easter is coming up & The Case For Christ just came out in theatres this past weekend. (hoping to see it soon!). "Based on the true story of an award-winning investigative journalist -- and avowed atheist -- who applies his well-honed journalistic and legal skills to disprove the newfound Christian faith of his wife... with unexpected, life-altering results." 

I was very excited to hear that one of my favourite books had been made into a movie!! I've been told that its a quite faithful adaptation (yay!). There's a Documentary based on the book thats on Youtube as well. So good!:D


    I have several projects on the go (and many more in my head, lol:). I just finished this latest version of McCalls 6886 in this cute camo print! I think I'll get tons of wear out of it come summer! I made it a tank dress this time. I made a neck band the same way as my floral version. I also added bands around the armholes too. I sewed a line of basting stitches around the armholes (partly to prevent the fabric from stretching out of shape, and partly to mark the line, so I could quickly cut away the SA). I wanted to try on the dress to make sure I wasn't cutting away too much fabric. Maybe it was my fabric choice (the camo is very light-weight ribbed knit from Atlantic Fabrics), but I had to adjust the shoulders to better fit me.


My floral version:)


     I think the straps of this tank are perfect! The coverage is full enough that I don't have to worry about bra straps showing (drives me crazy!).


     I've decided to pare down my old School Jacket! I *love* this jacket and I wore it ALL the time (even inside the house, lol).
   
  I totally look pregnant in this photo (I'm not!). My buff brother (5' 11")  was over the other day and this jacket fit him perfectly! Its a size Medium, but I think its unisex sizing! My husband took these shots right after my dress photos & joked that we could fit our whole family in this jacket:p


I'd like to wear this again, but I'm totally not into the oversize style. It needs a makeover! Praying I don't ruin it (I already cut into it). I'll do a more thorough post once I'm done. I think I've been watching too many "Thrifted Transformation" videos on Youtube, lol!


  Well, thanks for stopping by! Til next time!:)

Monday, 3 April 2017

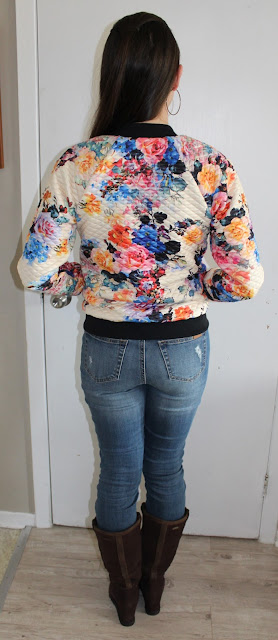
Grannie-Chic, Floral Bomber Jacket:)


"Your adornment must not be merely external—braiding the hair, and wearing gold jewelry, or putting on dresses; but let it be the hidden person of the heart, with the imperishable quality of a gentle and quiet spirit, which is precious in the sight of God."

1 Peter 3:3-4 


     Finally done my second version of McCalls pattern 7100. I call this one my "Grannie-Chic" Bomber since its a quilted-knit fabric. My own Grannie, sewed most of her life (and made a ton of quilts!) and this jacket reminds me of her:) My last two blog posts I went into more detail on:

lining up the front print & adding & inserting a full jacket lining.

McCalls 7100 is unlined. I added a lining to this version and my first one. I learned lots while making both jackets, but I prefer how the lining is added in this floral version. 
Version #1


I used a beautiful mauve silky satin fabric I had in my stash.


   Well, that's all for this post. Mostly just modelling photos for this one:) Bye for now!

Floral Bomber, Part 2 (Lining)

"I tell you, everyone who confesses Me before men, the Son of Man will also confess him  before the angels of God. But whoever denies Me before men will be denied before the angels of God."

Luke 12:8-9


      Happy Monday everybody:) I've learned so much during this project & even though it was confusing at times, I've really come to understand just how simple it is to line a jacket by machine (with as little hand-sewing as little as possible, lol:)

I took a few photos of the process (now that I'm done and looking back, I made it *far* more complicated than it needed to be! I did my own thing in attaching the waistband & lining so I'll try to explain this as clearly as possible. There's a few construction step photos I deleted by mistake! Hope this helps someone anyway:p


   As I showed in my last post, I attached the black waistband to the front (floral) bands and then to the main jacket & inserted the zipper (don't topstitch the zipper yet!).

I used the same main body pattern pieces (front, side front, back & sleeves) and attached the front facing piece directly onto the front pieces of the lining.

(In hindsight I wish I had left that facing piece off the lining, since it made the zipper area very bulky and difficult to topstitch afterwards. Maybe I didn't trim seams enough??)


I then attached the lining to the waist-band at the bottom all the way across, right-sides-together.


This next step is bringing the seam allowances of either side of the waist-band together and sewing between the front (floral) bands.

 I think it'll make more sense if you actually have a jacket you're working on. If in doubt, hand-baste it at first so its easy to remove the stitches if you make a mistake! (I did lots of basting!:) You could also use pins and act out the steps as well! I *hate* having to unpick stitches!


I referred to Kelly's kids bomber jacket tutorial blog post a lot while trying to figure out how to attach the lining to my particular jacket. Very helpful!

 I purchased Kelly's 12month-12 year kids Bomber Jacket pattern & I can't wait to use it for my boys!! She has a free 2T pattern available as well! I was inspired to use a quilted knit after finding her post (I think its the exact same fabric too!:)


  Here, the jacket and lining are placed right-sides-together. I found it helpful to pin it at the top first, then line up the rest. I sewed up both sides of the zipper and then up around the collar.

I pulled the jacket right side out to make sure everything looked ok, then turned it inside out again to trim seams.


   I turned up the sleeve seam allowance and tacked it in a couple places (so I wouldn't get the sleeve twisted and attached weird later lol) & pulled out the sleeves through the opening I left for turning and machine sewed the lining to the cuff.


   I did topstitch the zipper (it was very bulky with the facing) but just stitched in the ditch of the seams around the bottom band. The final step was sewing the hole closed (that I left for turning the jacket right-side-out) and clipping any loose threads. Next post will just be of me wearing my jacket!:D